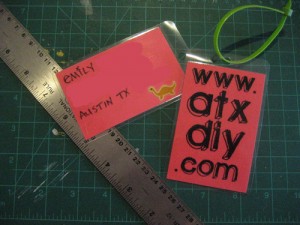
Our First Merch: DIY Luggage Tags
One of my favorite aspects of the indie craft movement is the sharing of ideas. Online communities, like Craftster, have fostered an environment where the sharing of ideas, resources, and inspiration are the norm. Far from being possessive, many crafters share the step by step instructions for their projects with anyone, free of charge. Of course, this does create problems for those makers trying to get by on the profits from their crafts. How many times have we gone to craft fairs or surfed Etsy and, upon seeing someone’s offerings, thought “I could make that!”. Such a declaration is not typically followed by an eagerness to reach for your wallet in order to pay full price for something you could make, usually for much cheaper. Despite this potentially earning-damaging reality, you can find a free tutorial online for just about every item in the craft repertoire. Not all crafts are created equal and skill of execution, access to materials and tools, and aesthetic judgment does vary – ultimately, the cream floats to the top.
At the risk of running myself out of business, one of my visions for this site is to share how to instructions (and eventually, step by step tutorials) with y’all. For ATX DIY’s wide berth, that means sharing recipes, gardening tips, craft tutorials, and much more. So, stay tuned! To get things rolling, here’s some quick info about a project I finished recently. I’ve traveled more this year than usual, and have lost a few luggage tags in the process – no big deal, but I hate to keep paying for new ones, and felt like I could do better than the free paper ones the airlines provide. This simple project was made possible with the help from two of my crafty weapons of choice – my laminator and zip-ties. I printed out our logo on some colored paper I had floating around the craft room, and wrote all the pertinent contact info on the back. After adding a dinosaur sticker, I ran the cards through the laminator. A hole punch and zip tie finished the job, and we now have ATX DIY branded luggage.
For those of you without regular access to a laminator (I occasionally used the handy plastic melting machine while working at a school, then decided I needed one all to myself!), I can recommend a few alternatives. First of all, if you know me and live in Austin, contact me and I’d be happy to share! If not, Kinkos and other copy shops usually provide laminating service – if you’re paying someone else to do it, make sure to get as many things into one page of laminate as possible. Also, plastic badge pouches seem like they’d do the job nicely. I have a few floating around from various conferences I’ve attended, and always relish an opportunity to re-purpose – it sure beats adding ‘em to the landfill! Finally, clear packing tape and steady hands can work as a laminator in a pinch.
I think this relatively mundane project (born out of necessity, as so many great crafts are) has a lot of potential. I think they’d make fun stocking stuffers or great Bon Voyage gifts, and I like that they are endlessly customizable with any image, shape, color, etc. you choose. Now, where should we traveling next?
Browse Timeline
- (older) Where Crafters Come From: Happy Mother’s Day!
- (newer) The Reluctant Artist: Some of My Recent Work

