Cuernavaca – Dias 3 & 4
Tuesday was pretty laid back – amazing huevos rancheros for breakfast, classes, then soup and tuna salad for lunch. After lunch, I took a siesta and stayed in that evening doing homework, blogging, and uploading photos.
Wednesday was much more interesting. Sopes for breakfast, then I walked to school. Towards the end of our afternoon conversation class, a group of us (9 students in total) skipped out early to go on a field trip. Our host families had packed up lunches, and we ate in the van. It was about an hour drive to our first stop, the archeological site of Xochicalco. For those following this as a food blog, my lunch was a couple of sandwiches with queso panela (one with tomatoes and lettuce, the other with sweet guayaba), a banana, an apple, and a little pan dulce (sweet bread, but not like a brain “sweet breadâ€, actual bread that is sweet, like a little cake).
Our driver and guide for the trip was Edgar, a man who works at the school (his mom, Rosita, is the family host coordinator for the school). First he took us to the museum and showed us around – he was very knowledgeable and it was great having a semi-private tour. The museum was built in the 90s and is a very green building – it has double stone walls to stay cool, LED lights, skylights in every room, water collection, and runs completely on solar power and water they save from rain (unless it’s super dry, in which case they sometimes have to bring in water).
Cuernavaca – Dias 1 & 2
Written on October 20, 2014
I arrived in Cuernavaca yesterday evening, and everything has been fantastic so far. I really have nothing but great things to say about my experience (short as it has been, thus far) and want everyone to come here and have a similar adventure! My posts are going to be a bit long, so apologies in advance, and feel free to skim. I’ll also try to lean towards advice and tips for future Cuernavaca travelers and students at ASLI.

There are flowers all over Cuernavaca, it’s called the City of Eternal Spring. Cuernavaca grows and exports cut flowers.
I’ll start with travel and arrival – I flew out of Austin, to Dallas, then into Mexico City. The flights were fairly uneventful, if running a little behind schedule. Flying into Mexico City is crazy – it’s so vast and colorful, I kept thinking “this must be the biggest city I’ve ever seenâ€, only to be informed by Bug and my host mom later that it is, in fact, the largest city in the world. So yeah. (Although for the sake of accuracy, Wikipedia has a more complicated definition of biggest city.).
East Austin Studio Tour 2012: Emily’s Picks
So, we’ve been busy… mostly with work. Oh yeah, and planning our wedding which is happening in a little over a week. Yikes!
The wedding planning has sparked an unprecedented surge of productivity in other areas. Basically, super productive procrastination. We’ve hosted a number of dinners for groups of friends, made a baby quilt, and cleaned the house a number of times. I guess that’s a good thing.
This rare blog post is yet another sophisticated procrastination attempt. It’s East Austin Studio Tour this weekend and next, and since we won’t get to go on much (if any) of the tour this year, you’ll have to go for us!
Catalogs are bigger than ever this year, and are available at Austin Library locations (as well as E.A.S.T. stops, but they go quickly!). There are nearly 200 studios on the map and even more participating artists.
Because I just didn’t have enough to do, I made a quick list of my picks for tour stops this year. Download yourself a copy here:Â EAST2012
The list is by no means comprehensive, but it does include a few of my all time favorite stops, many of the multi-artist sites, and some spots that I haven’t checked out before but look particularly interesting to me.
As always, if you find yourself on the eastside this weekend or next, I encourage you to stop into a few studios – the diversity is my favorite part of the tour. Some of my favorite spots have been accidental discoveries, only revealed because I checked out something nearby a planned destination.
Bring some money and buy some local art for holiday gifts (for yourself or others!).
Best of all, just get out there and see how artists are working in your backyard (sometimes quite literally).
Enjoy!
Poptails: White and Black Russian Pudding Pops
The success of last week’s Raspberry Margarita Poptails inspired me to buy a new Popsicle mold. This new beauty uses wooden sticks, which is nice because then I can make a bunch and pass them out to friends, and not wait to get the plastic sticks back. If you’re in Austin, they sell this mold at Wheastville for about $15.
I pretty much want to make every poptail recipe from Endless Simmer, but the one that I was most eager to attempt is the White Russian Pudding Pops. I wasn’t too keen on making my own pudding, and found this mix that doesn’t use gelatin at Wheatsville:
Here are the ingredients for the White Russian Pudding Pops:
- 1 box Cooked Vanilla Pudding Mix
- 2 1/4 cups Whole Milk
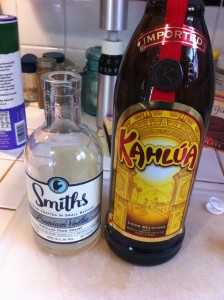
- 4 ounces Smith’s Vodka
- 2 ounces Kahlua
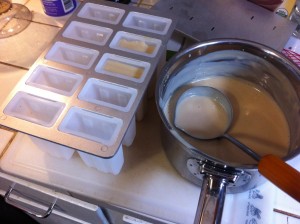
Instructions: I prepared the pudding as per the instructions on the box. When I make these again, I’ll use that extra 1/4 cup of milk, so that one batch fills the 10 pop molds (when I only used 2 cups of milk, the batch made eight and a half pops). I whisked the pudding mix and milk over medium heat, pretty much constantly until it thickened and just began to bubble. At that point, I turned the heat off, and added the Vodka and Kahlua. I mixed it all together until smooth.
At this point, the pudding mixture was delicious, but still pretty warm. I filled a big bowl with ice water and put my pot inside the ice bath, and continued to stir the pudding. Once the pudding was only slightly warm, I filled the pop molds (don’t let it get too cold – the pudding will start to set and be difficult to pour into the molds).
The pops have been in the freezer for a few hours now, and are setting up quite nicely. I can’t wait to pull them out of the molds so that I can make a Black Russian batch using the chocolate pudding. We’ll be bringing the pops to Maker Monday tomorrow, so I’ll let you know how they are received.
A note about Smith’s Vodka: Bug has good friends from college, Joe and Kelly, who moved to Bastrop with their two boys, a few years ago. They are such an amazing family – they have a fantastic garden, dozens of hens, a part share in a milk cow, goats, bees, and all the related skills this urban homesteader dreams about acquiring. Joe’s latest professional endeavor is as VP of Operations for Bone Spirits, makers of Smith’s Vodka. We got a bottle early on, and have really enjoyed it. Unlike most other distillers, Bone Spirits gets grains from local farmers and do their own mash to turn them into alcohol (other distillers get high-proof, commercial grade ethanol in bulk, then re-distill it). We are excited for Joe and to support Bone Spirits’ farm to bottle approach. They also have a Moonshine (un-aged, white whiskey), and an aged Corn Whiskey, under the name Fitch’s Goat. Check back for some Fitch’s Goat cocktail and poptail recipes soon!
Poptails: Making Summer in Austin a Little Sweeter
By now, if you’re on Pinterest, or read just about any food blog, you’ve been enticed by poptails. Or Cocksicles, as I’ve also seen them called… but that’s just a little too wrong (even for me). This older cousin of the popsicle, and more refined older sister of the jello shot, even had a feature in the New York Times.
It’s been a busy summer for us, and making popsicles has been a fun, if quick DIY endeavor. Last week, I mixed up some Raspberry Margarita Pops. They got devoured before I could take a pic, but Bug shot a photo of the “leftovers” (I added some ice to the pop-base, and blended it to make a frozen margarita):
 I didn’t write down the recipe at the time, but I’m pretty sure it went something like this:
Ingredients:
- 10 0z bag frozen Raspberries
- 1/2 cup Blanco or Silver Tequila
- 1/3 cup Triple Sec
- 1 cup homemade Sour Mix*
- 1/2 cup water
Instructions: Pulse all ingredients in a blender until smooth. Pour into popsicle molds and freeze until solid.
Notes: These were great and tasted quite boozy after freezing. Because alcohol doesn’t freeze, you need to make sure your poptails have plenty of non-alcoholic content. These froze well, and did come out of the molds, but were definitely slushier than virgin popsicles.
*Sour Mix: Here’s one version from Epicurious. Requires lots of Lemon and Lime juicing, but it’s so worth it. That recipe would make way more than you need for these pops – maybe consider making a half recipe, or explore some other cocktail possibilities. Friends don’t let friends buy pre-bottled, shelf-stable, “Sour Mix”.
Up next: White and Black Russian Pudding Pops
Food is Free Comes to Cherrywood
A couple of weeks ago, we came home to find this letter on our porch:
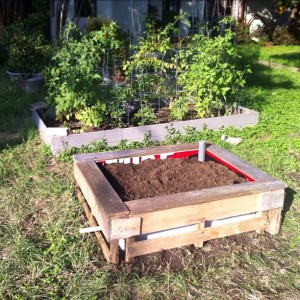
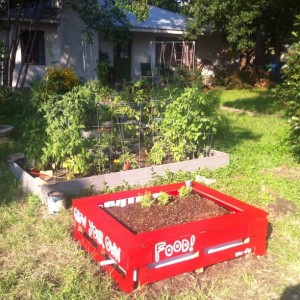
In what turned out to be a happy coincidence for us, the folks over at Food is Free picked our block to host their second installation of front yard wicking garden beds. Wicking beds are self-contained raised beds that hold a reservoir of water underneath them; the plant’s roots pull water up from the reservoir, acting much like an aquifer.
The Food is Free beds are made out of easy to source materials, that can ideally be found free. They use pallets to construct a box. The sides of the box are then lined with corrugated plastic (from leftover election signs) and the bottom lined with waterproof tarps. Next, gravel is poured in to the bottom of the bed (in our case, they used tumbled recycled glass that you can get free from the city of Austin). The gravel layer is covered in burlap (or some other type of water-permeable sheeting), and that layer is topped with soil. One larger PVC pipe runs from the top of the bed into the gravel layer, and a smaller drainage pipe is connected out the side of the bed.
Emily painted the bed and we put in our first plants: boxwood basil, and a variety of hot peppers. It’s kind of an off-season time to start plants, as there aren’t many things to plant in May in Austin.
There are nearly a dozen total beds that were installed in our immediate neighborhood, most in yards that didn’t already have front yard food gardens. We’re hoping that a few more homes request and maintain gardens. It should be super cool to have a street full of community garden beds that neighbors help themselves to. You can request a wicking bed for your own home from the Food is Free project.
In other garden news, we harvested some fingerling potatoes and are getting tons of cherry tomatoes every day.
In the fall, we started a field of native grasses and wildflower seeds in our backyard. We got the seeds at the Wildflower Center’s Fall Sale from Native American Seed Company. So far, we’ve had somewhat mixed results – more weeds (and fewer wildflowers) popped up than we would have liked, but the experiment continues. After pulling out a bunch of weeds (the seeds were in the soil already, not from the seed mix), it’s looking pretty good and we’re starting to see some bursts of color from some flowers.
Attributes of Creativity

In college, I took a design class, and this list of “some attributes of creativity” resonated with me. I reflect on it periodically, and today, I immortalize it on my blog.
Some attributes of creativity are:
– Challenging assumptions
– Being receptive to new ideas
– Recognizing similarities or differences
– Making unlikely connections
– Taking risks
– Building on ideas to make better ideas
– Looking at things in new ways
– Taking advantage of the unexpected
– Taking chances
*Photos in this post by Bug, taken at Architects of Air
Paper Poppy Tutorial
It’s too hot and dry (is “droughty” a word?) for real flowers, so I made some paper poppies instead. They’re pretty simple and incredibly cheerful – make some yourself!
I made the first batch using vellum for the petals and scrapbooking cardstock for the stamen. For the one I made to craft this tutorial, I used pretty basic printer paper.
Materials and Tools:
- Paper for the petals (1 sheet of 8.5″ x 11″ paper makes 2 poppies)
- Paper for the stamen (usually black, yellow, or orange)
- Floral wire (18 or 20 gauge works well)
- Floral tape (the same color as your floral wire)
- A bead (the same color as your stamen paper)
- Thin wire (I used 28 gauge jewelry wire)
- Pencil
- Scissors
- Hot glue gun (& glue sticks)
- Needle nose pliers (with wire cutters)
- Paper Poppies Template (downloaded and printed out): paperpoppiestemplate
Steps:
1) If you haven’t already, download and print out the Paper Poppies Template by clicking the link in the Supplies list. Cut out the Petal and Stamen templates – you’ll trace them shortly!
2) Fold your petal paper into eights, so that it looks like this picture:
3) Trace the petal template onto one piece of the folder paper:
4) Cut out the petal shape through four layers of your paper. These will be the four petals for your first poppy! There should be enough petal paper left to make four more petals.
Trace and cut the stamen template out of your other sheet of paper. You should now have four petals and one stamen:
We’re just getting started… keep reading this post for the rest of the tutorial!
Good Luck to The Joiner’s Apprentice
We at ATXDIY are huge fans of Kickstarter. When our friend Rob Campbell told us he was planning to build a hand-tools-only workshop to teach himself 1800-style cabinetry, we knew we had to support him. Check out his project here, and watch this video to see what it’s all about:
ATX DIY is contributing two rewards for people who contribute to Rob’s campaign. The first will be a screen printed canvas patch with serged edges, suitable for any messenger bag, jean jacket, or baseball cap.
 The second will be an extension of our tool roll design, done in natural canvas, with an antique tool screenprint.
We look forward to seeing Rob’s progress updates and the handiwork from his bench.
Chicken Coop Tour Recap
We had 300 visitors come to visit our flock for the Funky Chicken Coop Tour yesterday! If you came by, thanks for visiting. We got lots of interest in our coop – specifically from folks who are thinking about building a similar coop and raising a small flock like ours. As mentioned previously, we used plans from Catawba ConvertiCoops and have been really happy with the coop.
I just wanted to write up a quick post with answers to the most frequently asked questions we got yesterday during the tour.
About the coop specifically, we estimate that it cost up about $200 dollars in materials and was made over the course of a couple weekends (we’re fairly handy, but not necessarily master woodworkers or anything). It’s really helpful to have a chop saw that’ll do mitered cuts for all the angled pieces. Other than that, we pretty much only used a power drill and a jigsaw to make the handles.
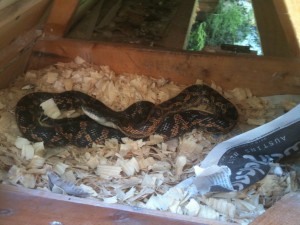
We got a ton of questions about predators getting at our hens. In the almost two years that we’ve had chickens in the backyard we haven’t had any problems with raccoons, possums, or anything that was after our birds. We have twice spotted a snake in the top of the coop – one time at night when the ladies were upstairs (they didn’t seem to notice the snake at all) and again during the day in the egg box (it had a big bulge in it’s belly, so it’s safe to assume that it’s interested in the eggs). A few weeks ago, Bug went outside to check for eggs, and instead of eggs, there was a piece of snake shed in the nest box – presumably we’d had a visitor earlier that day.
Both Bug and I like snakes, and the snake (or snakes) that we’ve spotted in the coop are harmless rat snakes. We already get plenty of eggs, so we’re happy to pay a small tax to the snake as long as it keeps our backyard ecosystem healthy (and takes care of varmints!).
We definitely have raccoons and opossums in our neighborhood, but they haven’t been able to get into our coop (or they haven’t tried). The plans specifically instruct you to use hardware cloth instead of mere chicken wire and poultry staples instead of just staple guns. Raccoons can rip out chicken wire fixed with staple guns. The bottom of our coop isn’t covered with anything, but you could possibly use more hardware cloth around the bottom. You could also make an apron of wire extending outward on the ground around the coop so that digging creatures would have a harder time getting in. We just haven’t had a problem yet, so we haven’t had to build a more secure fortress.
We also got a lot of inquiries about how the bird and the coop holds up in the weather. In the summer, we make sure that the coop is placed in part of the yard that gets afternoon shade (most of our yard is shaded). In the really hot summer days (when it gets over 100 degrees) we have run a fan on the coop. The birds don’t seem to mind the heat too much – their top roost is fairly well ventilated. If you’re looking at keeping hens in Texas, make sure to look for breeds that do well in heat (or all climates).
This winter we had a cold snap that dropped temperatures down into the teens for a few days in a row. During that time, we brought our whole coop into the studio (it barely fit!) and left the ladies there for a few days. That was probably more coddling then our birds needed; a week later there was another cold day but the birds were up and out scratching around downstairs first thing in the morning. It would be quite easy to run a red light bulb upstairs in the roost for really cold nights.
I’m off to rest and recoup (recoop?) but feel free to email or leave us questions in the comment section. We’re thrilled to encourage more backyard chicken keepers!


